VPC Network Address Translation When you associate an ENI with a public IP address, the ENI maintains its private IP address. Associating a public IP with an ENI doesn’t reconfigure the ENI with a new address. Instead, the Internet gateway maps the public IP address to the ENI’s private IP address using a process called network address translation (NAT). When an instance with a public IP connects to a host on the Internet, the host sees the traffic as originating from the instance’s public IP. For example, assume an instance with a private IP address of 172.31.7.10 is associated with the EIP 35.168.241.48. When the instance attempts to send a packet to the Internet host 198.51.100.11, it will send the following packet to the Internet gateway:
The Internet gateway will translate this packet to change the source IP address to the instance’s public IP address. The translated packet, which the Internet gateway forwards to the host, looks like this:
Likewise, when a host on the Internet sends a packet to the instance’s EIP, the Internet gateway will perform network address translation on the incoming packet. The packet that reaches the Internet gateway from the Internet host will look like this:
The Internet gateway will translate this packet, replacing the destination IP address with the instance’s private IP address, as follows:
Network address translation occurs automatically at the Internet gateway when an instance has a public IP address. You can’t change this behaviour. Network address translation as described here is also sometimes called one-to-one NAT because one private IP address gets mapped to one public IP address.
Although network address translation occurs at the Internet gateway, there are two other resources that can also perform NAT. – NAT gateway – NAT instance AWS calls these NAT devices. The purpose of a NAT device is to allow an instance to access the Internet while preventing hosts on the Internet from reaching the instance directly. This is useful when an instance needs to go out to the Internet to fetch updates or to upload data but does not need to service requests from clients. When you use a VPC Network Address Translation device, the instance needing Internet access does not have a public IP address allocated to it. Incidentally, this makes it impossible for hosts on the Internet to reach it directly. Instead, only the NAT device is configured with a public IP. Additionally, the VPC Network Address Translation device has an interface in a public subnet. Refer to Table 4.7 for an example.
When db1 sends a packet to a host on the Internet with the address 198.51.100.11, the packet must first go to the NAT device. The NAT device translates the packet as follows:
The NAT device then takes the translated packet and forwards it to the Internet gateway. The Internet gateway performs NAT translation on this packet as follows:
Multiple instances can use the same NAT device, thus sharing the same public IP address for outbound connections. The function that NAT devices perform is also called port address translation (PAT).
Instances that use the NAT device must send Internet-bound traffic to it, while the NAT device must send Internet-bound traffic to an Internet gateway. Hence, the NAT device and the instances that use it must use different default routes. Furthermore, they must also use different route tables and hence must reside in separate subnets. Refer to Table 4.7 again. Notice that the instances reside in the Private subnet, and the NAT device is in the Public subnet. The default routes for these subnets would follow the pattern in Table 4.8.
Refer to the diagram in Figure 4.2 to see the relationship between both of the route tables. Recall that a route target must be a VPC resource such as instance, Internet gateway, or ENI. The specific target you choose depends on the type of NAT device you use: a NAT gateway or a NAT instance.
VPC Network Access Control Lists (NACL) functions as a firewall in that it contains inbound and outbound rules to allow traffic based on a source or destination CIDR, protocol, and port. Also, each VPChas a default NACL that can’t be deleted.But the similarities end there. A NACL differs from a security group in many respects. Instead of being attached to an ENI, a NACL is attached to a subnet. The NACL associated with a subnet controls what traffic may enter and exit that subnet. This means that NACLs can’t be used to control traffic between instances in the same subnet. If you want to do that, you have to use security groups. A subnet can have only one NACL associated with it. When you create a new subnet in a VPC, the VPC’s default NACL is associated with the subnet by default. You can modify the default NACL, or you can create a new one and associate it with the subnet. You can also associate the same NACL with multiple subnets, provided those subnets are all in the same VPC as the NACL. Unlike a security group, which is stateful, a NACL is stateless, meaning that it doesn’t track the state of connections passing through it. This is much like an access control list (ACL) on a traditional switch or router. The stateless nature of the NACL is why each one is preconfigured with rules to allow all inbound and outbound traffic, as discussed in the following sections,VPC Network Access Control Lists.
Inbound rules determine what traffic is allowed to ingress the subnet. Each rule contains the following elements:
Rule number
Protocol
Port range
Source
Action
VPC Network Access Control Lists, The default NACL for a VPC with no IPv6 CIDR comes prepopulated with the two inbound rules listed in
NACL rules are processed in ascending order of the rule number. Rule 100 is the lowest numbered rule, so it gets processed first. This rule allows all traffic from any source. You can delete or modify this rule or create additional rules before or after it. For example, if you wanted to block only HTTP (TCP port 80), you could add the following rule:before or after it. For example, if you wanted to block only HTTP (TCP port 80), you could add the following rule:
This rule denies all TCP traffic with a destination port of 80. Because it’s the lowest numbered rule in the list, it gets processed first. Any traffic not matching this rule would be processed by rule 100, which allows all traffic. The last rule in Table 4.5 is the default rule. It’s designated by an asterisk (*) instead of a number and is always the last rule in the list. You can’t delete or otherwise change the default rule. The default rule causes the NACL to deny any traffic that isn’t explicitly allowed by any of the preceding rules. Complete Exercise 4.6 to create a custom NACL.
As you might expect, the outbound NACL rules follow an almost identical format as the inbound rules. Each rule contains the following elements:
Rule number
Protocol
Port range
Destination
Action
Each default NACL comes with the outbound rules listed in Table 4.6. Notice that the rules are identical to the default inbound rules except for the Destination element.In most cases you will need these rules whether you use the default NACL or a custom one. Because a NACL is stateless, it won’t automatically allow return traffic. Therefore, if you permit HTTPS traffic with an inbound rule, you must also explicitly permit the return traffic using an outbound rule. In this case, rule 100 permits the return traffic. If you do need to restrict access from the subnet—to block Internet access, for example—you will need to create an outbound rule to allow return traffic over ephemeral ports. Ephemeral ports are reserved TCP or UDP ports that clients listen for reply traffic on. As an example, when a client sends an HTTPS request to your instance over TCP port 80, that client may listen for a reply on TCP port 36034. Your NACL’s outbound rules must allow traffic to egress the subnet on TCP port 36034. The range of ephemeral ports varies by client operating system. Many modern operating systems use ephemeral ports in the range of 49152–65535, but don’t assume that allowing only this range will be sufficient. The range for TCP ports may differ from the range for UDP, and older or customized operating systems may use a different range altogether. To maintain compatibility, do not restrict outbound traffic using a NACL. Use a security group instead. If your VPC includes an IPv6 CIDR, AWS will automatically add inbound and outbound rules to permit IPv6 traffic.
Overview of an Amazon Virtual Private Cloud Virtual service provides the networking layer of EC2. A VPC is a virtual network that can contain EC2 instances as well as networkresources for other AWS services. By default, every VPC is isolated from all other networks.You can, however, connect your VPC to other networks, including the Internet and other VPCs. In addition to EC2, VPCs are foundational to many AWS services, so understanding how they work is fundamental to your success on the exam and as an AWS architect. Don’t assume you can ignore VPCs just because you’re not using EC2. A VPC can exist only within an AWS region. When you create a VPC in a region, it won’t show up in any other regions. You can have multiple VPCs in your account and create multiple VPCs in a single region. To keep things simple, I’ll start by assuming only one VPC in one region. Later, I’ll cover considerations for multiple VPCs. If you’re familiar with the components of a traditional network, you’ll find many VPC components to be familiar. But although VPCs function like a traditional TCP/IP network, they are scalable, allowing you to expand and extend your network without having to add physical hardware. To make this scalability possible, some components that you’d find in a traditional network—such as routers, switches, and VLANs—don’t exist in VPCs. Instead, they’re abstracted into software functions and called by different names.
Like a traditional network, a VPC consists of at least one range of contiguous IP addresses. This address range is represented as a Classless inter domain routing (CIDR) block. The CIDR block determines which IP addresses may be assigned to instances and other resources within the VPC. You must assign a primary CIDR block when creating a VPC. There are different ways to represent a range of IP addresses. The shortest way is by CIDR notation, sometimes called slash notation. For example, the CIDR 172.16.0.0/16 includes all addresses from 172.16.0.0 to 172.16.255.255—a total of 65,536 addresses! You may also hear the CIDR block referred to as an IP prefix. The /16 portion of the CIDR is the prefix length. The prefix length of a VPC CIDR can range from /16 to /28. There’s an inverse relationship between the prefix length and the number of IP addresses in the CIDR. The smaller the prefix length, the greater the number of IP addresses in the CIDR. A /28 prefix length gives you only 16 addresses. The acronym IP refers to Internet Protocol version 4 or IPv4. Valid IPv4 prefix lengths range from /0 to /32. Although you can specify any valid IP range for your VPC CIDR, it’s best to use one in the RFC 1918 range to avoid conflicts with public Internet addresses.
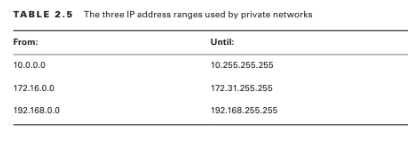
10.0.0.0–10.255.255.255 (10.0.0.0/8)
172.16.0.0–172.31.255.255 (172.16.0.0/12)
192.168.0.0–192.168.255.255 (192.168.0.0/16)
If you plan on connecting your VPC to another network—whether an on-premises network or another VPC—be sure the VPC CIDR you choose doesn’t overlap with addresses already in use on the other network. You can’t change the primary CIDR block, so think carefully about your address requirements before creating a VPC.
Secondary CIDR Blocks
You may optionally specify secondary CIDR blocks for a VPC after you’ve created it. These blocks must come from either the same address range as the primary or a publicly routable range, but they must not overlap with the primary or other secondary blocks. For example, if the VPC’s primary CIDR is 172.16.0.0/16, you may specify a secondary CIDR of 172.17.0.0/16. But you may not specify 192.168.0.0/16. If you think you might ever need a secondary CIDR, be careful about your choice of primary CIDR. If you choose 192.168.0.0/16 as your primary CIDR, you won’t be able to create a secondary CIDR using any of the RFC 1918 ranges.
IPv6 CIDR Blocks
You may let AWS assign an IPv6 CIDR to your VPC. Unlike the primary CIDR, which is an IP prefix of your choice, you can’t choose your own IPv6 CIDR. Instead, AWS assigns one to your VPC at your request. The IPv6 CIDR will be a publicly routable prefix from the global unicast IPv6 address space. For example, AWS may assign you the CIDR 2600:1f18:2551:8900/56. Note that the prefix length of an IPv6 VPC CIDR is always /56. Complete Exercise 4.1 to create your own VPC.
Subnets
A subnet is a logical container within a VPC that holds your EC2 instances. A subnet lets you isolate instances from each other, control how traffic flows to and from your instances, and lets you organize them by function. For example, you can create one subnet for public web servers that need to be accessible from the Internet and create another subnet for database servers that only the web instances can access. In concept, subnets are similar to virtual LANs (VLANs) in a traditional network. Every instance must exist within a subnet. You’ll often hear the phrase “launch an instance into a subnet.” Once you create an instance in a subnet, you can’t move it. You can, however, terminate it and create a different instance in another subnet. By extension, this also means you can’t move an instance from one VPC to another.
Each subnet has its own CIDR block that must be a subset of the VPC CIDR that it resides in. For example, if your VPC has a CIDR of 172.16.0.0/16, one of your subnets may have a CIDR of 172.16.100.0/24. This range covers 172.16.100.0–172.16.100.255, which yields a total of 256 addresses. AWS reserves the first four and last IP addresses in every subnet. You can’t assign these addresses to any instances. Assuming a subnet CIDR of 172.16.100.0/24, the following addresses would be reserved:
172.16.100.0–172.16.100.3
172.16.100.255
The restrictions on prefix lengths for a subnet CIDR are the same as VPC CIDRs. Subnet CIDR blocks in a single VPC can’t overlap with each other. Also, once you assign a CIDR to a subnet, you can’t change it. It’s possible for a subnet and VPC to share the same CIDR. This is uncommon and won’t leave you room for additional subnets. More commonly, each subnet’s prefix length will be longer than the VPC’s to allow for multiple subnets to exist in the same VPC. A subnet can’t have multiple CIDRs. Unlike a VPC that can have secondary CIDRs, a subnet can have only one. However, if a VPC has a primary CIDR and a secondary CIDR, your subnet’s CIDR can be derived from either. For example, if your VPC has the primary CIDR of 172.16.0.0/16 and a secondary CIDR of 172.17.0.0/16, a subnet in that VPC could be 172.17.12.0/24, as it’s derived from the secondary VPC CIDR.
This Blog Article is posted byInfosavvy, 2nd Floor, Sai Niketan, Chandavalkar Road Opp. Gora Gandhi Hotel, Above Jumbo King, beside Speakwell Institute, Borivali West, Mumbai, Maharashtra 400092
Introduction to VPC Elastic Network Interfaces is an elastic network interface (ENI) allows an instance to communicate with other network resources including AWS services, other instances, on-premises servers, and the Internet. It also makes it possible for you to connect to the operating system running on your instance to manage it. As the name suggests, an ENI performs the same basic function as a network interface on a physical server, although ENIs have more restrictions on how you can configure them. Every instance must have a primary network interface (also known as the primary ENI) , which is connected to only one subnet. This is the reason you have to specify a subnet when launching an instance. You can’t remove the primary ENI from an instance.
Each instance must have a primary private IP address from the range specified by the subnet CIDR. The primary private IP address is bound to the primary ENI of the instance. You can’t change or remove this address, but you can assign secondary private IP addresses to the primary ENI. Any secondary addresses must come from the same subnet that the ENI is attached to. It’s possible to attach additional ENIs to an instance. Those ENIs may be in a different subnet, but they must be in the same availability zone as the instance. As always, any addresses associated with the ENI must come from the subnet to which it is attached.
Attaching Elastic Network Interfaces
An ENI can exist independently of an instance. You can create an ENI first and then attach it to an instance later. For example, you can create an ENI in one subnet and then attach it to an instance as the primary ENI when you launch the instance. If you disable the Delete on Termination attribute of the ENI, you can terminate the instance without deleting the ENI. You can then associate the ENI with another instance. You can also take an existing ENI and attach it to an existing instance as a secondary ENI. This lets you redirect traffic from a failed instance to a working instance by detaching the ENI from the failed instance and reattaching it to the working instance. Complete Exercise 4.3 to practice creating an ENI and attaching it to an instance.
Internet Gateways
An Internet gateway gives instances the ability to receive a public IP address, connect to the Internet, and receive requests from the Internet. When you create a VPC, it does not have an Internet gateway associated with it. You must create an Internet gateway and associate it with a VPC manually. You can associate only one Internet gateway with a VPC. But you may create multiple Internet gateways and associate each one with a different VPC. An Internet gateway is somewhat analogous to an Internet router an Internet service provider may install on-premises. But in AWS, an Internet gateway doesn’t behave exactly like a router. In a traditional network, you might configure your core router with a default gateway IP address pointing to the Internet router to give your server’s access to the Internet. An Internet gateway, however, doesn’t have a management IP address or network interface. Instead, AWS identifies an Internet gateway by its resource ID, which begins with igw- followed by an alphanumeric string. To use an Internet gateway, you must create a default route in a route table that points to the Internet gateway as a target.
Route Tables
Configurable virtual routers do not exist as VPC resources. Instead, the VPC infrastructure implements IP routing as a software function and AWS calls this function an implied router (also sometimes called an implicit router). This means there’s no virtual router on which to configure interface IP addresses or dynamic routing protocols. Rather, you only have to manage the route table which the implied router uses. Each route table consists of one or more routes and at least one subnet association. Think of a route table as being connected to multiple subnets in much the same way a traditional router would be. When you create a VPC, AWS automatically creates a default route table called the main route table and associates it with every subnet in that VPC. You can use the main route table or create a custom one that you can manually associate with one or more subnets. If you do not explicitly associate a subnet with a route table you’ve created, AWS will implicitly associate it with the main route table. A subnet cannot exist without a route table association.
Routes
Routes determine how to forward traffic from instances within the subnets associated with the route table. IP routing is destination-based, meaning that routing decisions are based only on the destination IP address, not the source. When you create a route, you must provide the following elements:
Destination
Target
The destination must be an IP prefix in CIDR notation. The target must be an AWS network resource such as an Internet gateway or an ENI. It cannot be a CIDR. Every route table contains a local route that allows instances in different subnets to communicate with each other. Table 4.2 shows what this route would look like in a VPC with the CIDR 172.31.0.0/16.
The Default Route
The local route is the only mandatory route that exists in every route table. It’s what allows communication between instances in the same VPC. Because there are no routes for any other IP prefixes, any traffic destined for an address outside of the VPC CIDR range will get dropped.To enable Internet access for your instances, you must create a default route pointing to the Internet gateway. After adding a default route, you would end up with this:
The 0.0.0.0/0 prefix encompasses all IP addresses, including those of hosts on the Internet. This is why it’s always listed as the destination in a default route. Any subnet that is associated with a route table containing a default route pointing to an Internet gateway is called a public subnet. Contrast this with a private subnet that does not have a default route. Notice that the 0.0.0.0/0 and 172.31.0.0/16 prefixes overlap. When deciding where to route traffic, the implied router will route based on the closest match. Suppose an instance sends a packet to the Internet address 198.51.100.50. Because 198.51.100.50 does not match the 172.31.0.0/16 prefix but does match the 0.0.0.0/0 prefix, the implied router will use the default route and send the packet to the Internet gateway. AWS documentation speaks of one implied router per VPC. It’s important to understand that the implied router doesn’t actually exist as a discrete resource. It’s an abstraction of an IP routing function. Nevertheless, you may find it helpful to think of each route table as a separate implied router. Follow the steps in Exercise 4.4 to create an Internet gateway and a default route.
Security Groups
A security group functions as a firewall that controls traffic to and from an instance by permitting traffic to ingress or egress that instance’s ENI. Every ENI must have at least one security group associated with it. One ENI can have multiple security groups attached, and the same security group can be attached to multiple ENIs. In practice, because most instances have only one ENI, people often think of a security group as being attached to an instance. When an instance has multiple ENIs, take care to note whether those ENIs use different security groups. When you create a security group, you must specify a group name, description, and VPC for the group to reside in. Once you create the group, you specify inbound and outbound rules to allow traffic through the security group.
Inbound rules specify what traffic is allowed into the attached ENI. An inbound rule consists of three required elements:
Source
Protocol
Port range
When you create a security group, it doesn’t contain any inbound rules. Security groups use a default-deny approach, also called whitelisting, which denies all traffic that is not explicitly allowed by a rule. When you create a new security group and attach it to an instance, all inbound traffic to that instance will be blocked. You must create inbound rules to allow traffic to your instance. For this reason, the order of rules in a security group doesn’t matter. Suppose you have an instance running an HTTPS-based web application. You want to allow anyone on the Internet to connect to this instance, so you’d need an inbound rule to allow all TCP traffic coming in on port 443 (the default port and protocol for HTTPS). To manage this instance using SSH, you’d need another inbound rule for TCP port 22. However, you don’t want to allow SSH access from just anyone. You need to allow SSH access only from the IP address 198.51.100.10. To achieve this, you would use a security group containing the inbound rules listed in Table 4.3.
Services Related Elastic Compute Cloud (EC2) in this article you will learn different types of EC2 Services like AWS Systems Manager, Placement Groups, AWS Elastic Beanstalk and Amazon Elastic Container Service and AWS Far gate etc.
EC2-Related Services
This section will briefly introduce you to a few more EC2 features. Some of these features won’t necessarily play a large role in the solutions architect exam but could definitely come in handy for you in your work at some point. Others are only touched on here but will be examined in greater detail later in the book.
Systems Manager Services (available through the AWS console) is a collection of tools for monitoring and managing the resources you have running in the AWS cloud and in your own on-premises infrastructure. Through the Systems Manager portal, you can organize your AWS resources into resource groups, mine various visualization tools for insights into the health and behaviour of your operations, directly execute commands or launch tasks remotely without having to log on, automate patching and other lifecycle events, and manage service parameters and access secrets.
Placement GroupsPlacement groups are useful for multiple EC2 instances that require especially low-latency network interconnectivity. There are two placement group strategies.
Cluster groups launch each associated instance within a single availability zone within close physical proximity to each other.
Spread groups separate instances physically across hardware to reduce the risk of failure-related data or service loss.
AWS Elastic Beanstalk
Elastic Beanstalk lets you upload your application code and define a few parameters, and AWS will configure, launch, and maintain all the infrastructure necessary to keep it running. That might include EC2 load-balanced and auto scaled instances, RDS database instances, and all the network plumbing you would otherwise have had to build yourself. Compatible languages and platforms include .NET, Java, Node.js, Python, and Docker. Elastic Beanstalk adds no charges beyond the cost of the running infrastructure itself.
Running Docker container-based applications at scale is the kind of thing that’s a natural fit for a cloud platform like AWS. Once upon a time, if you wanted to get that done, you’d have to fire up one or more robust EC2 instances and then manually provision them as your Docker hosts. With Amazon Elastic Container Service (ECS), however, AWS lets you launch a prebuilt Docker host instance and define the way you want your Docker containers to behave (called a task), and ECS will make it all happen. The containers will exist within an infrastructure that’s automated and fully integrated with your AWS resources. The more recently released Fargate tool further abstracts the ECS configuration process, removing the need for you to run and configure instances for your containers. With Fargate, all you do is package your application and set your environment requirements.
AWS Lambda
“Serverless” applications are powered by programming code that’s run on servers—just not servers under the control of the application owners. Instead, code can be configured to run when AWS’s Lambda servers are triggered by preset events. Lambda allows you to instantly perform almost any operation on demand at almost any time but without having to provision and pay for always-on servers.
VM Import/Export
VM Import/Export allows you to easily move virtual machine images back and forth between your on-premises VMware environment and your AWS account (via an S3bucket). This can make it much simpler to manage hybrid environments and to efficiently migrate workloads up to the AWS cloud.
Introduction to Amazon Glacier Service this is the blog topic in that you will learn S3 and Glacier Select, Amazon Glacier, Storage Pricing & Other Storage-Related Services like Amazon Elastic File System, AWS Storage Gateway, AWS Snowball etc
S3 and Glacier Select
AWS provides a different way to access data stored on either S3 or Glacier: Select. The feature lets you apply SQL-like queries to stored objects so that only relevant data from within objects is retrieved, permitting significantly more efficient and cost-effective operations. One possible use case would involve large CSV files containing sales and inventory data from multiple retail sites. Your company’s marketing team might need to periodically analyse only sales data and only from certain stores. Using S3 Select, they’ll be able to retrieve exactly the data they need—just a fraction of the full data set—while bypassing the bandwidth and cost overhead associated with downloading the whole thing.
At first glance, Glacier looks a bit like just another S3 storage class. After all, like most S3 classes, Glacier guarantees 99.999999999 percent durability and, as you’ve seen, can be incorporated into S3 lifecycle configurations.Nevertheless, there are important differences. Glacier, for example, supports archives as large as 40 TB rather than the 5 TB limit in S3. Its archives are encrypted by default, while encryption on S3 is an option you need to select; and unlike S3’s “human-readable” key names, Glacier archives are given machine-generated IDs. But the biggest difference is the time it takes to retrieve your data. Getting the objects in an existing Glacier archive can take a number of hours, compared to nearly instant access from S3. That last feature really describes the purpose of Glacier: to provide inexpensive long-term storage for data that will be needed only in unusual and infrequent circumstances.
Storage Pricing
To give you a sense of what S3 and Glacier might cost you, here’s a typical usage scenario. Imagine you make weekly backups of your company sales data that generate 5 GB archives. You decide to maintain each archive in the S3 Standard Storage and Requests class for its first 30 days and then convert it to S3 One Zone (S3 One Zone-IA), where it will remain for 90 more days. At the end of those 120 days, you will move your archives once again, this time to Glacier, where it will be kept for another 730 days (two years) and then deleted.Once your archive rotation is in full swing, you’ll have a steady total of (approximately) 20 GB in S3 Standard, 65 GB in One Zone-IA, and 520 GB in Glacier. Table 3.3 shows what that storage will cost in the US East region at rates current at the time of writing.
Of course, storage is only one part of the mix. You’ll also be charged for operations including data retrievals; PUT, COPY, POST, or LIST requests; and lifecycle transition requests. Full, up-to-date details are available at https://aws.amazon.com/s3/pricing/.
Other Storage-Related Services
It’s worth being aware of some other storage-related AWS services that, while perhaps not as common as the others you’ve seen, can make a big difference for the right deployment.
AmazonElastic File System
The Elastic File System (EFS) provides automatically scalable and shareable file storage. EFS-based files are designed to be accessed from within a virtual private cloud (VPC) via Network File System (NFS) mounts on EC2 instances or from your on-premises servers through AWS Direct Connect connections. The object is to make it easy to enable secure, low-latency, and durable file sharing among multipleinstances.
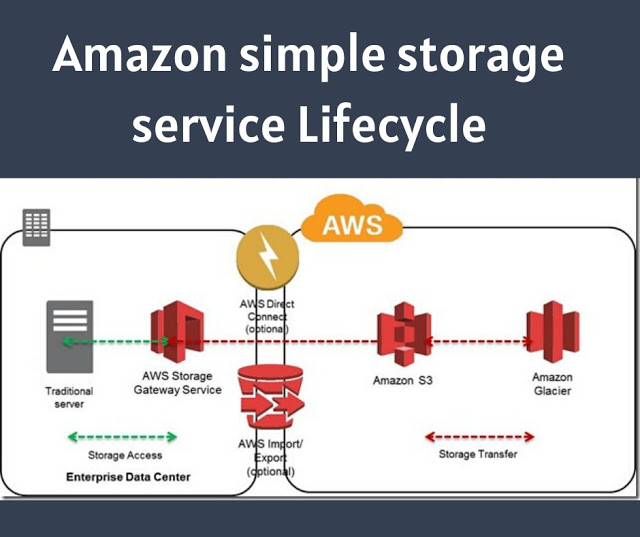
Integrating the backup and archiving needs of your local operations with cloud storage services can be complicated. AWS Storage Gateway provides software gateway appliances (based on VMware ESXi, Microsoft Hyper-V, or EC2 images) with multiple virtual connectivity interfaces. Local devices can connect to the appliance as though it’s a physical backup device like a tape drive, while the data itself is saved to AWS platforms like S3 and EBS.
This Blog Article is posted byInfosavvy, 2nd Floor, Sai Niketan, Chandavalkar Road Opp. Gora Gandhi Hotel, Above Jumbo King, beside Speakwell Institute, Borivali West, Mumbai, Maharashtra 400092
Amazon simple storage service Lifecycle offers more than one class of storage for your objects. The class you choose will depend on how critical it is that the data survives no matter what (durability), how quickly you might need to retrieve it (availability), and how much money you have to spend.
1. Durability
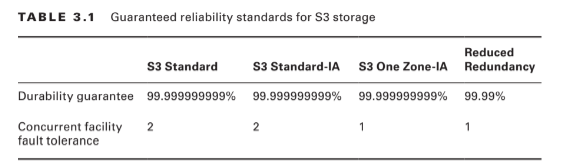
S3 measures durability as a percentage. For instance, the 99.999999999 percent durability guarantee for most S3 classes and Amazon Glacier is as follows: “. . . corresponds to an average annual expected loss of 0.000000001% of objects. For example, if you store 10,000,000 objects with Amazon S3, you can on average expect to incur a loss of a single object once every 10,000 years.” Source: https://aws.amazon.com/s3/faqs In other words, realistically, there’s pretty much no way that you can possibly lose data stored on one of the standard S3/Glacier platforms because of infrastructure failure. However, it would be irresponsible to rely on your S3 buckets as the only copies of important data. After all, there’s a real chance that a misconfiguration, account lockout, or unanticipated external attack could permanently block access to your data. And, as crazy as it might sound right now, it’s not unthinkable to suggest that AWS could one day go out of business. Kodak and Blockbuster Video once dominated their industries, right? The high durability rates delivered by S3 are largely because they automatically replicate your data across at least three availability zones. That means that even if an entire AWS facility was suddenly wiped off the map, copies of your data would be restored from a different zone. There are, however, two storage classes that aren’t quite so resilient. Amazon S3 One Zone-Infrequent Access (S3 One Zone-IA), as the name suggests, stores data in only a single availability zone. Reduced Redundancy Storage (RRS) is rated at only 99.99 percent durability (because it’s replicated across fewer servers than other classes). You can balance increased/decreased durability against other features like availability and cost to get the balance that’s right for you. All S3 durability levels are shown in Table 3.1.
2. Availability
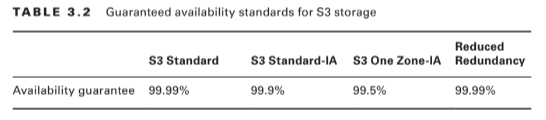
Object availability is also measured as a percentage, this time though, it’s the percentage you can expect a given object to be instantly available on request through the course of a full year. The Amazon S3 Standard class, for example, guarantees that your data will be ready whenever you need it (meaning: it will be available) for 99.99% of the year. That means there will be less than nine hours each year of down time. If you feel down-time has exceeded that limit within a single year, you can apply for a service credit. Amazon’s durability guarantee, by contrast, is designed to provide 99.999999999% data protection. This means there’s practically no chance your data will be lost, even if you might sometimes not have instance access to it. Table 3.2 illustrates the availability guarantees for all S3 classes.
3. Eventually Consistent Data
It’s important to bear in mind that S3 replicates data across multiple locations. As a result, there might be brief delays while updates to existing objects propagate across the system. Uploading a new version of a file or, alternatively, deleting an old file altogether can result in one site reflecting the new state with another still unaware of any changes. To ensure that there’s never a conflict between versions of a single object—which could lead to serious data and application corruption—you should treat your data according to an Eventually Consistent standard. That is, you should expect a delay (usually just two seconds or less) and design your operations accordingly. Because there isn’t the risk of corruption, S3 provides read-after-write consistency for the creation (PUT) of new objects.
Many of the S3 workloads you’ll launch will probably involve backup archives. But the thing about backup archives is that, when properly designed, they’re usually followed regularly by more backup archives. Maintaining some previous archive versions is critical, but you’ll also want to retire and delete older versions to keep a lid on your storage costs. S3 lets you automate all this with its versioning and lifecycle features.
5. Versioning
Within many file system environments, saving a file using the same name and location as a pre-existing file will overwrite the original object. That ensures you’ll always have the most recent version available to you, but you will lose access to older versions—including versions that were overwritten by mistake. By default, objects on S3 work the same way. But if you enable versioning at the bucket level, then older overwritten copies of an object will be saved and remain accessible indefinitely. This solves the problem of accidentally losing old data, but it replaces it with the potential for archive bloat. Here’s where lifecycle management can help.
6. Lifecycle Management
You can configure lifecycle rules for a bucket that will automatically transition an object’s storage class after a set number of days. You might, for instance, have new objects remain in the S3 Standard class for their first 30 days after which they’re moved to the cheaper One Zone IA for another 30 days. If regulatory compliance requires that you maintain older versions, your fi les could then be moved to the low-cost, long-term storage serviceGlacier for 365 more days before being permanently deleted.
Accessing S3 Objects
If you didn’t think you’d ever need your data, you wouldn’t go to the trouble of saving it to S3. So, you’ll need to understand how to access your S3-hosted objects and, just as important, how to restrict access to only those requests that match your business and security needs.
7. Access Control
Out of the box, new S3 buckets and objects will be fully accessible to your account but to no other AWS accounts or external visitors. You can strategically open up access at the bucket and object levels using access control list (ACL) rules, finer-grained S3 bucket policies, or Identity and Access Management (IAM) policies. There is more than a little overlap between those three approaches. In fact, ACLs are really leftovers from before AWS created IAM. As a rule, Amazon recommends applying S3 bucket policies or IAM policies instead of ACLs. S3 bucket policies—which are formatted as JSON text and attached to your S3 bucket— will make sense for cases where you want to control access to a single S3 bucket for multiple external accounts and users. On the other hand, IAM policies—because they exist at the account level within IAM—will probably make sense when you’re trying to control the way individual users and roles access multiple resources, including S3. The following code is an example of an S3 bucket policy that allows both the root user and the user Steve from the specified AWS account to access the S3 MyBucket bucket and its contents.
Amazon Simple Storage Service (S3) is where individuals, applications, and a long list of AWS services keep their data.It’s an excellent platform for the following:– Maintaining backup archives, log files, and disaster recovery images – Running analytics on big data at rest – Hosting static websites S3 provides inexpensive and reliable storage that can, if necessary, be closely integrated with operations running within or external to Amazon web services.
This isn’t the same as the operating system volumes you learned about in the previous chapter: those are kept on the block storage volumes driving your EC2 instances. S3, by contrast, provides a space for effectively unlimited object storage. What the difference is between object and block storage? With block-level storage, data on a raw physical storage device is divided into individual blocks whose use is managed by a file system. NTFS is a common file system used by Windows, while Linux might use Btrfs or ext4. The file system, on behalf of the installed OS, is responsible for allocating space for the files and data that are saved to the underlying device and for providing access whenever the OS needs to read some data. An object storage system like S3, on the other hand, provides what you can think of as a flat surface on which to store your data. This simple design avoids some of the OS-related complications of block storage and allows anyone easy access to any amount of professionally designed and maintained storage capacity. When you write files to S3, they’re stored along with up to 2 KB of metadata. The metadata is made up of keys that establish system details like data permissions and the appearance of a file system location within nested buckets.
Through the rest of this chapter, you’re going to learn the following:
– How S3 objects are saved, managed, and accessed – How to choose from among the various classes of storage to get the right balance of durability, availability, and cost – How to manage long-term data storage lifecycles by incorporating Amazon Glacier into your design – What other Amazon web services exist to help you with your data storage and access operations
S3 Service Architecture
You organize your S3 files into buckets. By default, you’re allowed to create as many as 100 buckets for each of your AWS accounts. As with other AWS services, you can ask AWS to raise that limit. Although an S3 bucket and its contents exist within only a single AWS region, the name you choose for your bucket must be globally unique within the entire S3 system. There’s some logic to this: you’ll often want your data located in a particular geographical region to satisfy operational or regulatory needs. But at the same time, being able to reference a bucket without having to specify its region simplifies the process.
Prefixes and Delimiters
As you’ve seen, S3 stores objects within a bucket on a flat surface without subfolder hierarchies. However, you can use prefixes and delimiters to give your buckets the appearance of a more structured organization. A prefix is a common text string that indicates an organization level. For example, the word contracts when followed by the delimiter / would tell S3 to treat a file with a name like contracts/acme.pdf as an object that should be grouped together with a second file named contracts/dynamic.pdf. S3 recognizes folder/directory structures as they’re uploaded and emulates their hierarchical design within the bucket, automatically converting slashes to delimiters. That’s why you’ll see the correct folders whenever you view your S3-based objects through the console or the API
Working with Large Objects
While there’s no theoretical limit to the total amount of data you can store within a bucket, a single object may be no larger than 5 TB. Individual uploads can be no larger than 5 GB. To reduce the risk of data loss or aborted uploads, AWS recommends that you use a feature called Multipart Upload for any object larger than 100 MB. As the name suggests, Multipart Upload breaks a large object into multiple smaller parts and transmits them individually to their S3 target. If one transmission should fail, it can be repeated without impacting the others. Multipart Upload will be used automatically when the upload is initiated by the AWS CLI or a high-level API, but you’ll need to manually break up your object if you’re working with a low-level API. An application programming interface (API) is a programmatic interface through which operations can be run through code or from the command line. AWS maintains APIs as the primary method of administration for each of its services. AWS provides low-level APIs for cases when your S3 uploads require hands-on customization, and it provides high-level APIs for operations that can be more readily automated. This page contains specifics: https://docs.aws.amazon.com/AmazonS3/latest/dev/uploadobjusingmpu.html
Encryption
Unless it’s intended to be publicly available—perhaps as part of a website—data stored on S3 should always be encrypted. You can use encryption keys to protect your data while it’s at rest within S3 and—by using only Amazon’s encrypted API endpoints for data transfers— protect data during its journeys between S3 and other locations. Data at rest can be protected using either server-side or client-side encryption.
Server-Side Encryption
– The “server-side” here is the S3 platform, and it involves having AWS encrypt your data objects as they’re saved to disk and decrypt them when you send properly authenticated requests for retrieval. You can use one of three encryption options – Server-Side Encryption with Amazon S3-Managed Keys (SSE-S3), where AWS uses its own enterprise-standard keys to manage every step of the encryption and decryption process – Server-Side Encryption with AWS KMS-Managed Keys (SSE-KMS), where, beyond the SSE-S3 features, the use of an envelope key is added along with a full audit trail for tracking key usage. You can optionally import your own keys through the AWS KMS service. – Server-Side Encryption with Customer-Provided Keys (SSE-C), which lets you provide your own keys for S3 to apply to its encryption
Client-Side Encryption
It’s also possible to encrypt data before it’s transferred to S3. This can be done using an AWS KMS–Managed Customer Master Key (CMK), which produces a unique key for each object before it’s uploaded. You can also use a Client-Side Master Key, which you provide through the Amazon S3 encryption client. Server-side encryption can greatly reduce the complexity of the process and is often preferred. Nevertheless, in some cases, your company (or regulatory oversight body) might require that you maintain full control over your encryption keys, leaving client-side as the only option.
You will learn in this blog AWS EC2 Storage Volumes, Elastic Block Store Volumes, EBS-Provisioned IOPS SSD, EBS General-Purpose SSD, Throughput-Optimized HDD and Cold HDD etc.
EC2 Storage Volumes
Storage drives are for the most part virtualized spaces carved out of larger physical drives. To the OS running on your instance, though, all AWS volumes will present themselves exactly as though they were normal physical drives. But there’s actually more than one kind of AWS volume, and it’s important to understand how each type works.
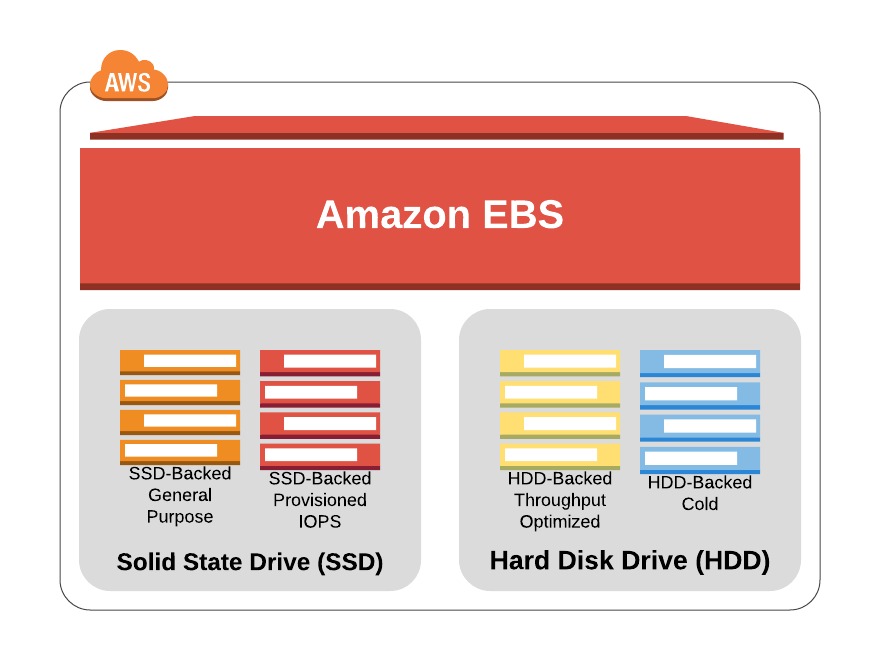
Elastic Block Store Volumes
You can attach as many Elastic Block Store (EBS) volumes to your instance as you like and use them just as you would as you would hard drives, flash drives, or USB drives with your physical server. And as with physical drives, the type of EBS volume you choose will have an impact on both performance and cost. The AWS SLA guarantees the reliability of the data you store on its EBS volumes (promising at least 99.999 percent availability), so you don’t have to worry about failure. When an EBS drive does fail, its data has already been duplicated and will probably be brought back online before anyone notices a problem. So, practically, the only thing that should concern you is how quickly and efficiently you can access your data. There are currently four EBS volume types, two using solid-state drive (SSD) technologies and two using the older spinning hard drives (HDDs). The performance of each volume type is measured in maximum IOPS/volume (where IOPS means input/output operations per second).
EBS-Provisioned IOPS SSD
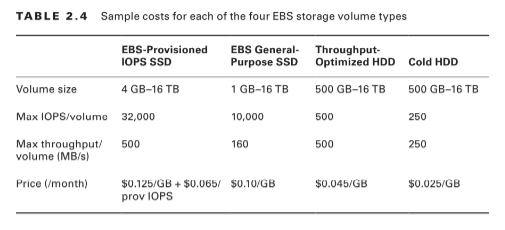
If your applications will require intense rates of I/O operations, then you should consider provisioned IOPS, which provides a maximum IOPS/volume of 32,000 and a maximum throughput/volume of 500 MB/s. Provisioned IOPS—which in some contexts is referred to as EBS Optimized—can cost $0.125/GB/month in addition to $0.065/provisioned IOPS.
EBS General-Purpose SSD
For most regular server workloads that, ideally, deliver low-latency performance, general purpose SSDs will work well. You’ll get a maximum of 10,000 IOPS/volume, and it’ll cost you $0.10/GB/month. For reference, a general-purpose SSD used as a typical 8 GB boot drive for a Linux instance would, at current rates, cost you $9.60/year.
Throughput-Optimized HDD
Throughput-optimized HDD volumes can provide reduced costs with acceptable performance where you’re looking for throughput-intensive workloads including log processing and big data operations. These volumes can deliver only 500 IOPS/volume but with a 500 MB/s maximum throughput/volume, and they’ll cost you only $0.045/GB/month.
Cold HDD
When you’re working with larger volumes of data that require only infrequent access, a 250 IOPS/volume type might meet your needs for only $0.025/GB/month. Table 2.4 lets you compare the basic specifications and estimated costs of those types.Tab le 2.4 Sample costs for each of the four EBS storage volume types
EBS Volume Features
All EBS volumes can be copied by creating a snapshot. Existing snapshots can be used to generate other volumes that can be shared and/or attached to other instances or converted to images from which AMIs can be made. You can also generate an AMI image directly from a running instance-attached EBS volume—although, to be sure no data is lost, it’s best to shut down the instance first. EBS volumes can be encrypted to protect their data while at rest or as it’s sent back and forth to the EC2 host instance. EBS can manage the encryption keys automatically behind the scenes or use keys that you provide through the AWS Key Management Service (KMS). Exercise 2.4 will walk you through launching a new instance based on an existing snapshot image.
Instance Store Volumes Unlike
EBS volumes, instance store volumes are ephemeral. This means that when the instances they’re attached to are shut down, their data is permanently lost. So, why would you want to keep your data on an instance store volume more than on EBS?– Instance store volumes are SSDs that are physically attached to the server hosting your instance and are connected via a fast NVMe interface. – The use of instance store volumes is included in the price of the instance itself. – Instance store volumes work especially well for deployment models where instances are launched to fill short-term roles (as part of autoscaling groups, for instance), import data from external sources, and are, effectively, disposable. Whether one or more instance store volumes are available for your instance will depend on the instance type you choose. This is an important consideration to take into account when planning your deployment. Even with all the benefits of EBS and instance storage, it’s worth noting that there will be cases where you’re much better off keeping large data sets outside of EC2 altogether. For many use cases, Amazon’s S3 service can be a dramatically less expensive way to store files or even databases that are nevertheless instantly available for compute operations. You’ll learn more about this in Chapter 3, “Amazon Simple Storage Service and Amazon Glacier Storage.”
Accessing Your EC2 Instance
Like all networked devices, EC2 instances are identified by unique IP addresses. All instances are assigned at least one private IPv4 address that, by default, will fall within one of the blocks shown in Table 2.5.
Out of the box, you’ll only be able to connect to your instance from within its subnet, and the instance will have no direct contact to the Internet. If your instance configuration calls for multiple network interfaces (to connect to otherwise unreachable resources), you can create and then attach one or more virtual Elastic Network Interfaces to your instance. Each of these interfaces must be connected to an existing subnet and security group. You can optionally assign a static IP address within the subnet range. Of course, an instance can also be assigned a public IP through which full Internet access is possible. As you learned earlier as part of the instance lifecycle discussion, the default public IP assigned to your instance is ephemeral and probably won’t survive a reboot.
In this blog you will learn Configuring an Environment Instance, AWS Regions, Tenancy , Configuring Instance Behaviour and Instance Lifecycle.
Configuring an Environment for Your Instance
Deciding where your EC2 instance will live is as important as choosing a performance configuration. Here, there are three primary details to get right: geographic region, virtual private cloud (VPC), and tenancy model.
AWS Regions
As you learned earlier, AWS servers are housed in data centers around the world and organized by geographical region. You’ll generally want to launch an EC2 instance in the region that’s physically closest to the majority of your customers or, if you’re working with data that’s subject to legal restrictions, within a jurisdiction that meets your compliance needs. EC2 resources can be managed only when you’re “located within” their region. You set the active region in the console through the drop-down menu at the top of the page and through default configuration values in the AWS CLI or your SDK. You can update your CLI configuration by running aws configure. Bear in mind that the costs and even functionality of services and features might vary between regions. It’s always a good idea to consult the most up-to-date official documentation.
VPCs
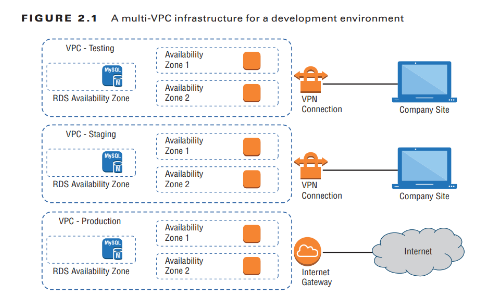
Virtual private clouds (VPCs) are easy-to-use AWS network organizers and great tools for organizing your infrastructure. Because it’s so easy to isolate the instances in one VPC from whatever else you have running, you might want to create a new VPC for each one of your projects or project stages. For example, you might have one VPC for early application development, another for beta testing, and a third for production (see Figure 2.1).
Adding a simple VPC that doesn’t incorporate a NAT gateway won’t cost you anything. You’ll learn much more about all this in , “Amazon Virtual Private Cloud.”
Tenancy
When launching an EC2 instance, you’ll have the opportunity to choose a tenancy model. The default setting is shared tenancy, where your instance will run as a virtual machine on a physical server that’s concurrently hosting other instances. Those other instances might well be owned and operated by other AWS customers, although the possibility of any kind of insecure interaction between instances is remote. To meet special regulatory requirements, your organization’s instances might need an extra level of isolation. The Dedicated Instance option ensures that your instance will run on its own dedicated physical server. This means that it won’t be sharing the server with resources owned by a different customer account. The Dedicated Host option allows you to actually identify and control the physical server you’ve been assigned to meet more restrictive licensing or regulatory requirements.
Configuring Instance Behaviour
You can optionally tell EC2 to execute commands on your instance as it boots by pointing to user data in your instance configuration (this is sometimes known as bootstrapping). Whether you specify the data during the console configuration process or by using the –user-data value with the AWS CLI, you can have script files bring your instance to any desired state. User data can consist of a few simple commands to install a web server and populate its web root, or it can be a sophisticated script setting the instance up as a working node within a Puppet Enterprise–driven platform.
Instance Pricing
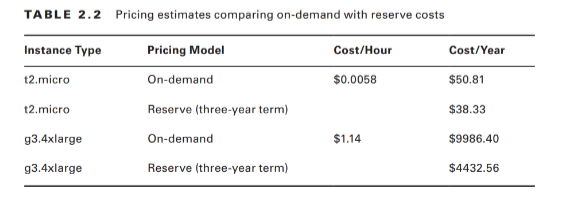
Use of EC2 instances can be purchased using one of three models. For always-on deployments that you expect to run for less than 12 months, you’ll normally pay for each hour your instance is running through the on-demand model. On-demand is the most flexible way to consume EC2 resources since you’re able to closely control how much you pay by stopping and starting your instances according to your need. But, per hour, it’s also the most expensive. If you’re planning to keep the lights burning 24/7 for more than a year, then you’ll enjoy a significant discount by purchasing a reserve instance—generally over a term commitment of between one and three years. You can pay up front for the entire term of a reserve instance or, for incrementally higher rates, either partially up front and the rest in monthly charges or entirely through monthly charges. Table 2.2 gives you a sense of how costs can change between models. These estimates assume a Linux platform, all up-front payments, and default tenancy. Actual costs may vary over time and between regions.
For workloads that can withstand unexpected disruption (like computation-intensive genome research applications), purchasing instances on Amazon’s Spot market can save you a lot of money. The idea is that you enter a maximum dollar-value bid for an instance type running in a particular region. The next time an instance in that region becomes available at a per-hour rate that’s equal to or below your bid, it’ll be launched using the AMI and launch template you specified. Once up, the instance will keep running either until you stop it—when your workload completes, for example—or until the instance’s per-hour rate rises above your maximum bid. You’ll learn more about the spot market and reserve instances in “The Cost Optimization Pillar.” It will often make sense to combine multiple models within a single application infrastructure. An online store might, for instance, purchase one or two reserve instances to cover its normal customer demand but also allow autoscaling to automatically launch on-demand instances during periods of unusually high demand. Use Exercise 2.3 to dive deeper into EC2 pricing.
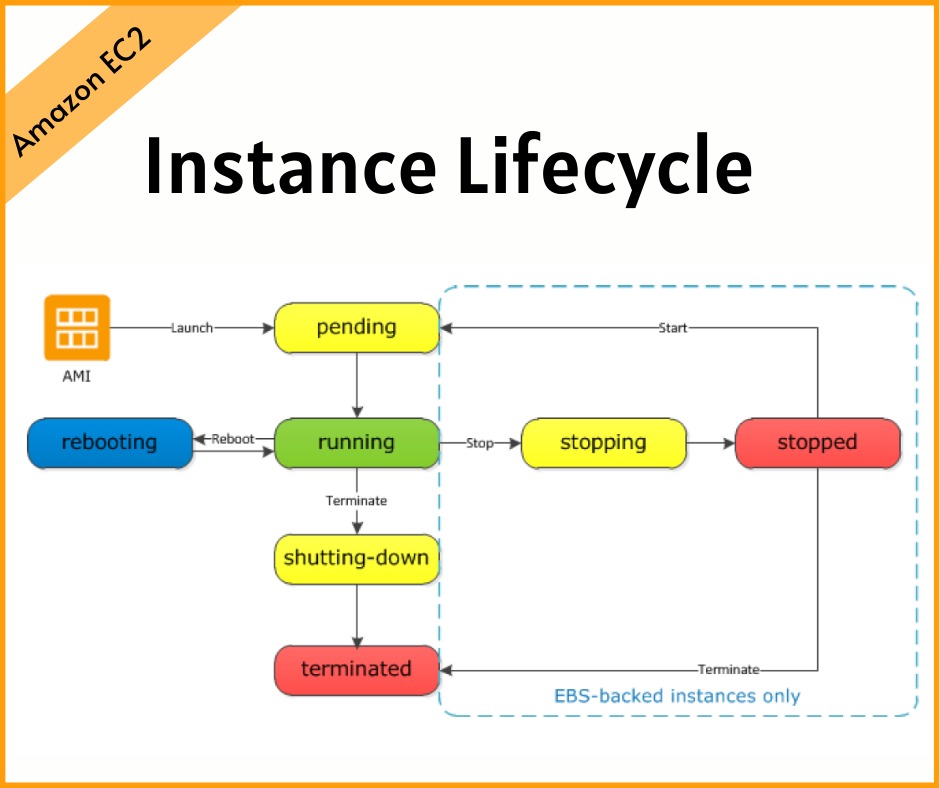
Instance Lifecycle
The state of a running EC2 instance can be managed in a number of ways. Terminating the instance will shut it down and cause its resources to be reallocated to the general AWS pool. If your instance won’t be needed for some time but you don’t want to terminate it, you can save money by simply stopping it and then restarting it when it’s needed again. The data on an EBS volume will in this case not be lost, although that would not be true for an instance volume. Later in this chapter, you’ll learn about both EBS and instance store volumes and the ways they work with EC2 instances.
You should be aware that a stopped instance that had been using a non-persistent public IP address will most likely be assigned a different address when it’s restarted. If you need a predictable IP address that can survive restarts, allocate an Elastic IP address and associate it with your instance. You can edit or change an instance’s security group (which I’ll discuss a bit later in this chapter) to update access policies at any time—even while an instance is running. You can also change its instance type to increase or decrease its compute, memory, and storage capacity (just try doing that on a physical server). You will need to stop the instance, change the type, and then restart it.